Hadoop & MapReduce with AWS EC2
Hadoop
Hadoop is an open source platform that expedites the processing & analysis of large data (both structured and unstructured) in a distributed computing environment. For a more deatiled overview of Hadoop - see my portfolio piece here. In this project we will spin up a Hadoop cluster using AWS Elastic Cloud Compute (EC2) which provides scalable cloud computing to developers.
Create EC2 Instances
Following the steps within EC2, create 4 Ubuntu instances within the free tier of the AWS services. (Note: as discovered later in the process, the free tier instances may not provide enough memory to run intended MapReduce problems)

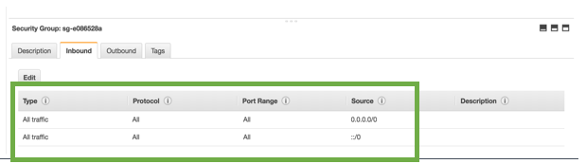
On each of these nodes – change the Security groups to be “open” to allow for remote access from any IP address or port. It is important to have these security settings for both the INBOUND and the OUTBOUND traffic to these instances. If you don’t make these security groups open, then attempting to SSH into the instances will result in a timeout error.
Create Key Pair
As before, we will need to use a Key Pair for AWS. We have already created the a-key.pem key and can be reused for this tutorial. (See previous portfolio Hadoop piece here.)
SSH Instance Configuration
Using the a-key.pem we are able to SSH into the instances. To SSH into the nodes we need both this key and the public DNS, which can be found on the EC2 homepage. 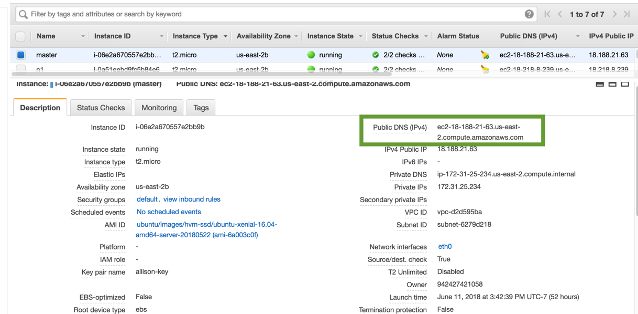
Since we will eventually want to SSH into all nodes we will need the DNS for each:
namenode => <name node dns>
datanode1 => <data node1 dns>
datanode2 => <data node2 dns>
datanode3 => <data node3 dns>
Before we SSH, we want to change the permissions of the Key to ensure that it is secure so we will modify the permissions (chmod) to ensure that the owner of the file can read and write. As recommended by the tutorial, we will run this command on the a-key.pem
local$ sudo chmod 600 ~/.ssh/a-key.pem
Now we are able to SSH into the notes without trouble. This can be done by passing both the key value pair and the user@publicDNS address. The user for our instances is “Ubuntu”
local$ ssh -i ~/.ssh/a-keey.pem ubuntu@<dns name node>
Since we will be SSH’ing into these instances quite a bit, it will be easier to set up a config file within ~/.ssh to provide an alias for each instance. This will allow for the command to change from the above address to: ssh namenode To make this change update the config file to include the public DNS for each instance. The namenode will be the master and each subsequent datanode (1-3) will act as the slave nodes.
Host namenode
  HostName <name node public dns>
  User ubuntu
  IdentityFile ~/.ssh/a-key.pem
Host datanode1
  HostName <datanode 1 public dns>
  User ubuntu
  IdentityFile ~/.ssh/A-key.pem
Host datanode2
  HostName <datanode 2 public dns>
  User ubuntu
  IdentityFile ~/.ssh/a-key.pem
Host datanode3
  HostName <datanode 3 public dns>
  User ubuntu
SSH From Master to Slave Nodes
The previous step allowed for password less entry into the namenode and datanodes from my personal computer. Another import step is enabling this password less SSH from the namenode into the individual datanodes. To do this, the allison-key.pem must be transferred to the namenode using scp (ssh copy command). Since we have set up the alias in the previous step this can be done with the following command:
local$ scp ~/.ssh/a-key.pem ~/.ssh/config namenode:~/.ssh
Now that we have the pem on the namenode, we will create a digital fingerprint to share with each instance of the datanodes. After SSH’ing into the namenode we can run the following commands:

After creating this id_rsa.pub fingerprint and copying it the authorized keys we can move it to each individual datanode. 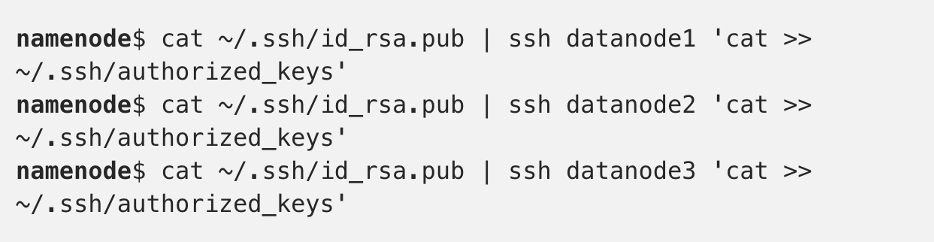
To validate that these digital finger prints worked, we can attempt to SSH into a datanode while on the masternode. This is important because this same interaction is what will happen during the MapReduce function – and needs to be a password less action during the data processing. 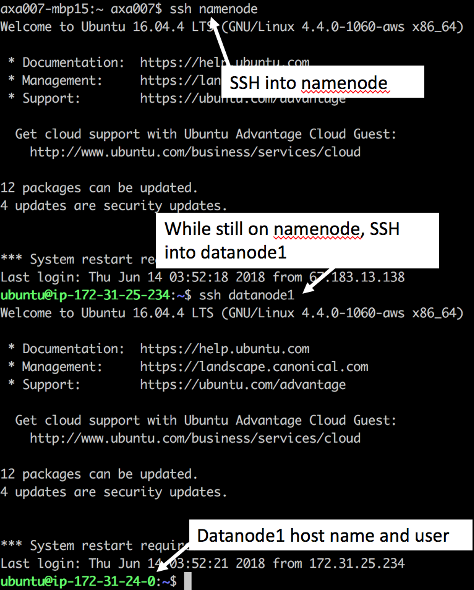
Installing Hadoop
Unlike with the EMR instances where we were able to select Hadoop and Hive software to be installed on spin up and launch, these instances do not include any software. Before we are able to install Hadoop, we must first install Java onto each instance. This can be done to all nodes at once by opening a terminal for each node and streaming to all four instances simulatneously. One error that I ran into was that the tutorial was created for an older version of Hadoop. This caused errors when I tried to run Hadoop with a lower level of a Java JDK installed (Unsupported major.minor version 52.0) To solve this problem, I had to change the installation to openjdk-8.
allnodes$ sudo apt-get install openjdk-8-jdk
To verify that the correct version of java was installed we can check by running java –version on the instance. We can see that it correctly has jdk-8. 
Now that Java is correctly installed, we can install Hadoop. This again ran into issues with the tutorial being outdated because the link to the mirror for Hadoop download was outdated. I found the updated mirror here. Again, these commands needs to be ran on all nodes.
allnodes$ wget wget http://apache.claz.org/hadoop/common/hadoop-3.0.3/hadoop-3.0.3.tar.gz  -P ~/Downloads
allnodes$ sudo tar zxvf ~/Downloads/hadoop-* -C /usr/local
allnodes$ sudo mv /usr/local/hadoop-* /usr/local/hadoop
Set Up Environment Variables With Hadoop successfully installed on each instance, we want to create environment variables for the reference to path files throughout the data query and configurations. These three environment variables will be:
- JAVA_HOME => where Java is installed on machine
- HADOOP_HOME => where Hadoop is installed
- HADOOP_CONF_DIR => directory within Hadoop that has configuration files
This can be ran on all nodes: 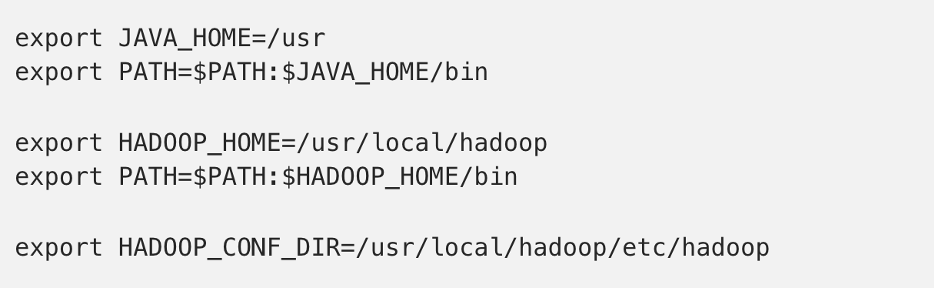
Again, on all nodes load the environment variables into the profile: 
We can validate that these have updated by echoing the path for each of these environment variables in each instance: 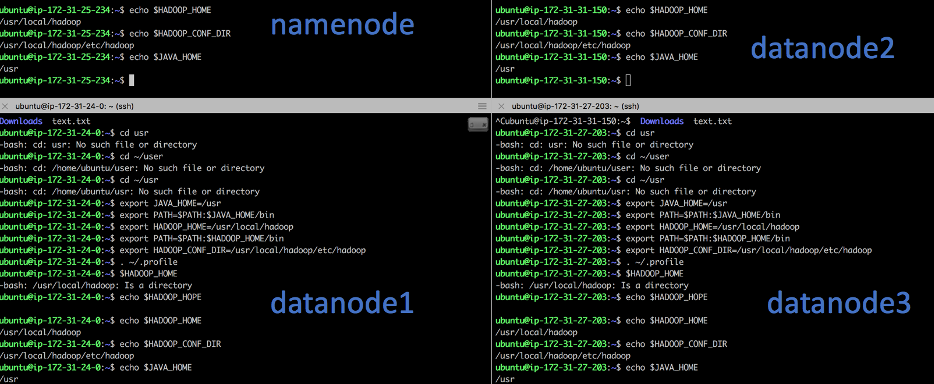
It is important to note that anytime you break the SSH connection to an instance these environment variables are not persisted on the instances.
Hadoop Specific Configurations
Several of the Hadoop files need to be updated to reflect the Public DNS and host names for the AWS EC2 instances. It is important to note that when an EC2 instance is restarted the publicDNS will change and all file will have to updated. I made these updates for each file by using the vim text editor directly within the bash terminal. The first configuration file to update is HADOOP_CONF_DIR/hadoop-env.sh to match our JAVA_HOME environment variable.
Important Files to Understand
- core-site.xml: The main configuration file for Hadoop. This file provides Hadoop with the default file system (fs.defaultFS) which is the publicDNS for the namenode (master). Adding this property allows for shortcut referencing of the dfs when running namenode commands.
- yarn-site.xml: The main configuration file for YARN (Yet Another Resource Negotiator) which is a resource manager and job scheduler that will be used for the processing across the hdfds cluster. In this file default values for core configurations are overwritten with the Public DNS of the namenode.
- mapred-site.xml: The main configuration file for MapReduce – where we will set references to Hadoop MapReduce files for input/output as well as set memory limits and a reference to the masternode PublicDNS. There is a jobtracker.address which provides the address at which to track the status of the MapReduce jobs being performed.
Updating Hadoop Files
The next file to update is the $HADOOP_CONF_DIR/core-site.xml and update the configuration property to look at the namenode public DNS. Update each instance to have the following configuration:
<configuration>
  <property>
    <name>fs.defaultFS</name>
    <value>hdfs://<public dns name>:9000</value>
   </property>
</configuration>
The next file to update is $HADOOP_CONF_DIR/yarn-site.xml. Again, we need to update the PublicDNS for the namenode in this configuration file across all instances.
<property>
  <name>yarn.nodemanager.aux-services</name>
  <value>mapreduce_shuffle</value>
</property>
<property>
  <name>yarn.nodemanager.aux-services.mapreduce.shuffle.class</name>
  <value>org.apache.hadoop.mapred.ShuffleHandler</value>
</property>
<property>
  <name>yarn.resourcemanager.hostname</name>
  <value><public dns of namenode></value>
</property>
Finally, we need to update the $HADOOP_CONF_DIR/mapred-site.xml to also look at the name node public DNS.
<configuration>
  <property>
    <name>mapreduce.jobtracker.addresss</name>
    <value><public dns name node>:54311</value>
  </property>
  <property>
    <name>mapreduce.framework.name</name>
    <value>yarn</value>
  </property>
</configuration>
Update Host Specific Configurations
For all nodes, we need to set up the host names for each instance. The host name is also the first part of the private DNS. For our configuration it is as follows:
namenode => <public dns> ip-172-31-25-234
datanode1 => <public dns> ip-172-31-24-0
datanode2 => <public dns> ip-172-31-31-150
datanode3 =><public dns>  ip-172-31-27-203
These updates need to be added to the /etc/hosts file on each instance.
NameNode Specific Configurations
Since one of the instances (namenode) is considered the master and the others are slaves, the master namenode needs to have the namenode configurations within hdfs, and the datanodes need to have datanode configurations.
To only the namenode, create a directory where the data can reside, and a masters file within the HADOOP_CONF_DIR
namenode$ sudo mkdir -p $HADOOP_HOME/hadoop_data/hdfs/namenode
namenode$ sudo touch $HADOOP_CONF_DIR/masters
Within the masters file, we now need to add the same hostname that was added in the above /etc/hosts files. To the master file, add the namenode host name ip.
To the same degree, we need to create a slaves file that will reference the host name of the associated slave instances in the HADOOP_CONF_DIR/slaves.
To ensure that all proper access is granted to the current user, make sure that the owner of HADOOP_HOME is set to the user. sudo chown -R ubuntu HADOOP_HOME
DataNode Specific Configurations
Just like with the Master namenode, there are several configurations that are specific to just the datanode (slave) instances. Instead of setting files to “namenode” we will now update them to be “datanode” for each instance. This is done within $HADOOP_CONF_DIR/hdfs-site.xml
<configuration>
  <property>
    <name>dfs.replication</name>
    <value>3</value>
  </property>
  <property>
    <name>dfs.datanode.data.dir</name>
    <value>file://userl/local/hadoop/hadoop_data/hdfs/datanode</value>
  </property>
</configuration>
The file referenced above does not yet exit (…hdfs/datanode) so we will need to create it on each datanode instance.
datanodes$ sudo mkdir -p $HADOOP_HOME/hadoop_data/hdfs/datanode
Starting Hadoop
Now that configurations are squared away it is time to work the magic and start Hadoop! Before running Hadoop for the first time it is necessary to format the configurations. This will set a file called CURRENT on the namenode and set the ClientID for the datanodes to connect with the namenode.
namenode$ hdfs namenode -format
Now that the namenode is ready to go, run the start command from $HADOOP_HOME
namenode$ $HADOOP_HOME/sbin/start-dfs.sh
This command is intended to start the namenode as well as all three datanodes. At first this command would only start the namenode. The health of the node cluster can be seen at the Public DNS and port 9870. Finding this correct port was frustrating, because the tutorial had an outdated version of Hadoop, and the port had been updated since the writing. After several hours of searching on the wrong error the port issue was diagnosed and be able to see the node live through the UI.
http://<public dns name node>:9870/dfshealth.html#tab-overview
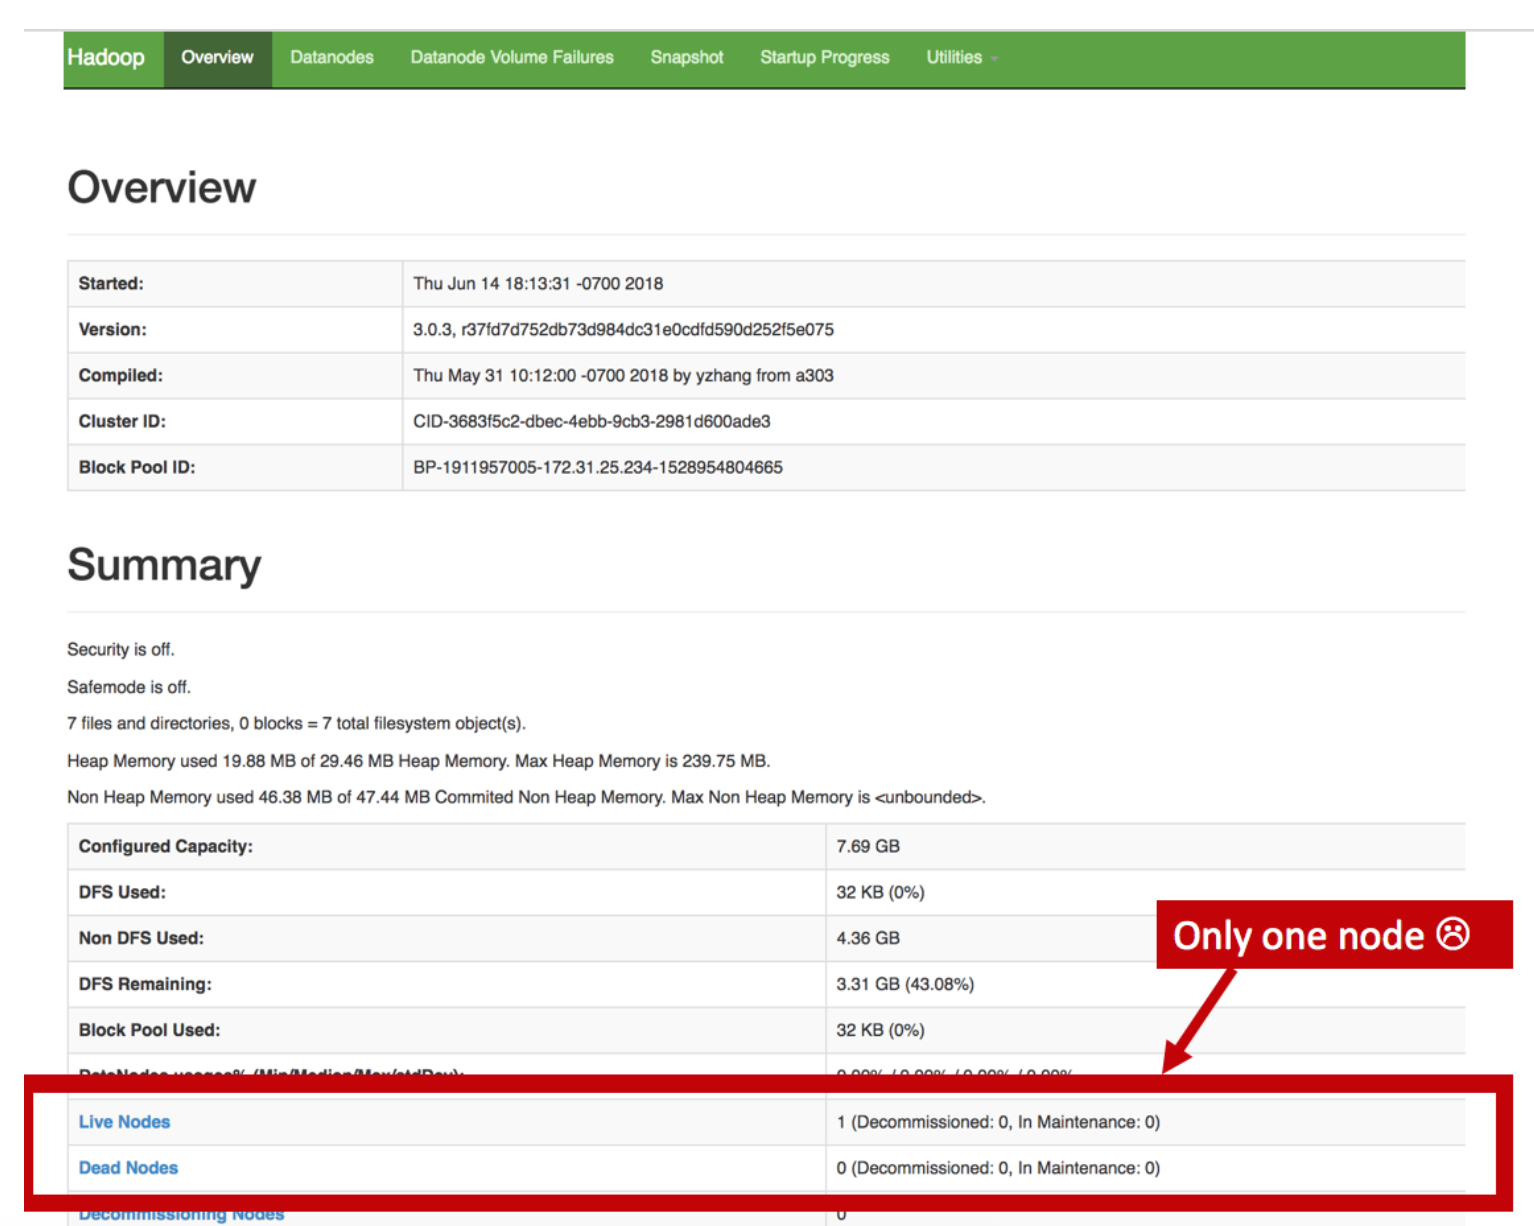
This UI allowed for easier debugging through the log file – Under the utilities tab. This helped to diagnose the two errors explained in detail in the next section, Common Problems and Solutions. Another way to tell the health of a node cluster is through the command hdfs dfsadmin –report which will produce the same UI in the command line.
To solve this problem, we can start each data node individually. This can be done by running the command hdfs datanode on each node.
hdfs datanode
Additionally, refreshing the UI will show that there are now four datanodes that are up and running:

Now that the nodes are running, from the master namenode we can start YARN and the MapReduce history server. This history server will show the history of all jobs ran on the cluster.

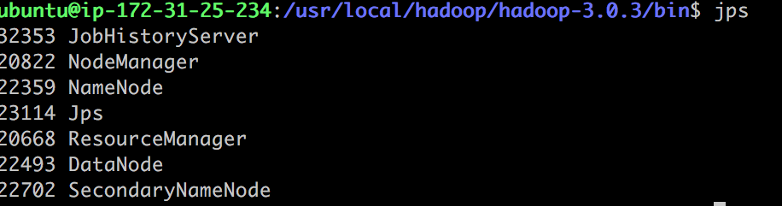
To validate that all these processes have started, run the jps command on the namenode. JPS looks for java process and returns the status and process ID of current programs.
The Hadoop clusters can been seen at:
The MapReduce History Server can be seen at:

Running MapReduce on Hadoop
The next step is to run a MapReduce function on the newly created Hadoop clusters. Just like with the EMR example, the goal is to run a data query and have the slavenodes chunk up the work and aggregate the answer back to the master namenode. One of the most common MapReduce example tutorials is for calculating the value of Pi – and is stored in the MapReduce example files at $HADOOP_HOME/share/hadoop/mapreduce/hadoop-mapreduce-examples-3.0.3.jar.
Before being able to run the MapReduce, the mapred-site.xml needed to be updated with the HADOOP_HOME environment variable to set configuration and file structure for both the map and the reduce processes. Additionally, the memory properties are required or else MapReduce will throw a “Exit Code 143” and terminate the instances due to lack of memory.
<property>
  <value>HADOOP_MAPRED_HOME=${HADOOP_HOME}</value>
 </property>
<property>
  <name>mapreduce.map.env</name>
  <value>HADOOP_MAPRED_HOME=${HADOOP_HOME}</value>
</property>
<property>
  <name>mapreduce.reduce.env</name>
  <value>HADOOP_MAPRED_HOME=${HADOOP_HOME}</value>
</property>
<property>
  <name>mapreduce.map.memory.mb</name>
  <value>2000</value>
</property>
<property>
  <name>mapreduce.reduce.memory.mb</name>
  <value>2000</value>
 </property>
Solving For Pi
Now that the configurations and memory on the new instances are set to go, it is time to Hadoop! The example program estimates the value of Pi using a quasi-Monte Carlo method. Since our instance is rather small, we used 10 maps with 10 sample values each tutorial source.
namenode$ hadoop jar $HADOOP_HOME/share/hadoop/mapreduce/hadoop-mapreduce-examples-3.0.3.jar pi 10 10
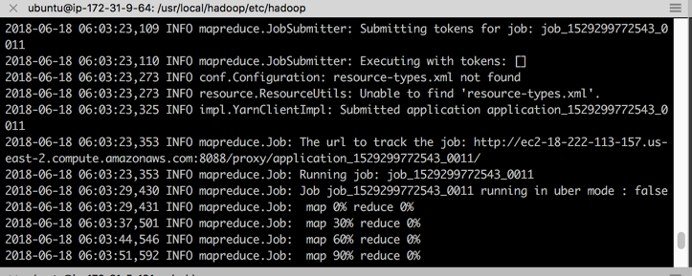
While the program runs, we can see that it is mapping and reducing the information across the nodes. At the end of process the value of Pi is returned. Our reduced version of only 10 samples provided a pie estimation of 3.2.
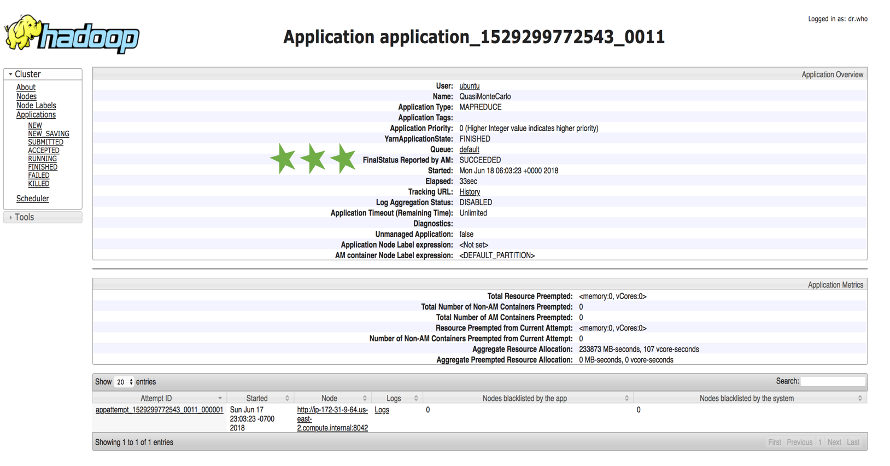
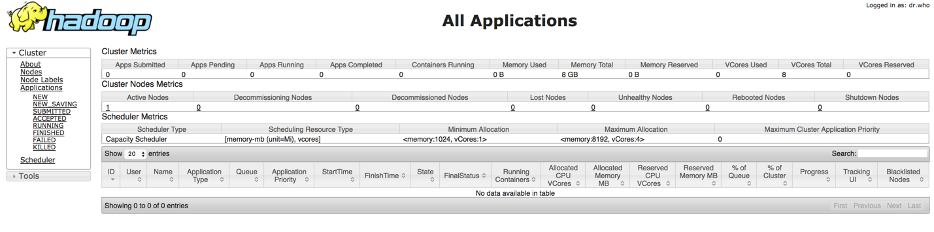
Job Validation in UI
The job success was returned in the console, but can also be viewed in the UI:
<namenode public dns>:8088/proxy/application_<job_id>/